Hey! Crafters!
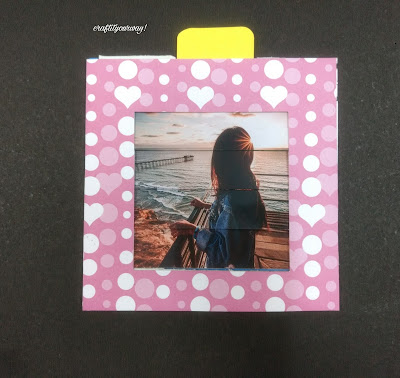
In this tutorial, I am going to show you guys how to make a card which can display two different images/pictures. This beautiful card works on a simple sliding mechanism. When you will pull the tag of the card you will see a different picture. And when you will put back the slider you will see a different picture............Isn't that interesting? The receiver will be astonished and fascinated by this pretty handmade card.
This PICTURE CHANGING CARD is quite complicated to make, but I know you will love making it. So let's check out its tutorial.
YOU WILL NEED


Your picture changing card or optical illution card is now ready.

In this tutorial, I am going to show you guys how to make a card which can display two different images/pictures. This beautiful card works on a simple sliding mechanism. When you will pull the tag of the card you will see a different picture. And when you will put back the slider you will see a different picture............Isn't that interesting? The receiver will be astonished and fascinated by this pretty handmade card.
This PICTURE CHANGING CARD is quite complicated to make, but I know you will love making it. So let's check out its tutorial.

1) Cardstock Paper
2) Decorative Papers
3) Pencil and Scale
4) Glue/ Adhesive
5) A Pair of Scissors
6) Double-sided foam tape
7) Paper Cutter/Craft Knife
8) 4 Images/Pictures
PROCEDURE FOR MAKING
1) You will need 2 sets of 2 different images/pictures measuring 8cm* 8cm. Leave some extra space around the pictures.

2) Divide each image into 4 equal parts of 2cm each.

In picture 1, Add 0.8cm above the 2nd and 4th line and in picture 2, Add 0.8cm above the 1st and 3rd line. Repeat this step with another set of pictures also. [ we will be cutting out the part between the brackets ]

At this moment, add 1.5cm to both the sides of any one set of pictures. Also, add 0.5cm to both the sides of another set of pictures.

3) Now, cut out the parts where brackets are marked and keep it aside in order. Remove any excess white space around the photo. After arranging the pictures mark numbers on the sides of the parts as it will be convenient for you to find out which part goes with which part.

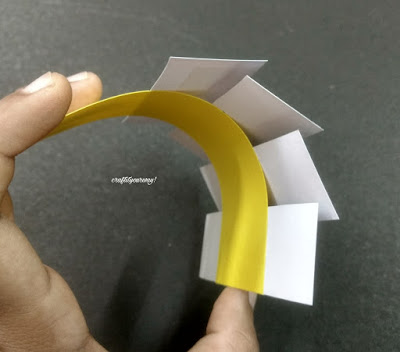
4) Take a craft paper and cut it in a measurement of 4cm*13cm. Choose any one of the pictures. Stick the last part of that picture on the bottom of the long strip.

Take the 3rd part of the picture and align it with the makings of the 4th part of the picture, mark the top of the picture on the strip. Then apply glue only to 0.5cm from that marking. Then stick the 3rd part of the picture.
Make sure they line up to form a continuous picture.


Similarly, stick the rest of the parts of that picture. And this will be a shutter of our card.


5) Take a cardstock paper measuring 13cm*13cm. Mark 1.5cm on both the sides and 2cm from the bottom.

Stick the last part of the other picture above 2cm marking. And keep it aside for a while.

6) Take the rest of the parts, cut off 4cm*0.6cm from the top center of each part.

7) Now, take the remaining part of the picture and apply glue on left and right sides of the picture where the white space would sit. Do not apply glue to the center.

Start sticking it one by one making sure that they line up to form one continuous photo. As you do so, insert the shutter into the bottom picture overlapping each strip.


Make sure it slides properly by pulling the tag.

8) Take a decorative paper of measurement 13cm*13cm. Mark 2.5cm from the sides, 2.8cm from the top and 2cm from the bottom of the paper. Cut out the inner square so formed.


Apply double sided foam tape on the sides and the bottom portion of the card. Apply thin foam tape on the top of the card. Now stick the decorative card over it properly.


Hope you all liked it.
THANK YOU!
No comments:
Post a Comment