Hey! Crafters!
Recently I made this beautiful Camera Shaped Mini Album for a special friend of mine. So I thought to share its tutorial with you guys. This tutorial is divided into three parts and creating each part is quite simple. Also, I have not added the pictures yet so you can add the pictures the way you want.

YOU WILL NEED
1) Cardstock Paper
2) Decorative Papers
3) Pencil and Scale
4) Glue/ Adhesive
5) A Pair of Scissors
6) Paper Cutter/Craft Knife
7) Eyelets and Ribbons
8) Punch machine
9) Transparent sheet
PROCEDURE FOR MAKING
8) Punch machine
9) Transparent sheet
PROCEDURE FOR MAKING
* Making Of Camera Box *
1) Take a card stock paper of measurement 28cm*21cm, Mark and score at 12cm and 16cm on the long side. Mark and score at 2.5cm and 18.5cm on the shorter side and cut the middle flap as shown below.


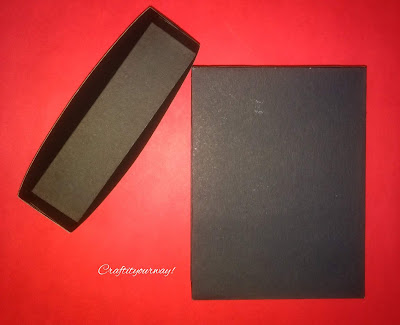


2) Now, apply glue on sides of the card and stick them together from both sides and then stick the smallest flap to the sides. It will form a box.


3) Now for the lid, take a cardstock of measurement 24.5cm*12cm. Mark and score at 4cm and 20.5cm, 4cm and 8cm on the long side and smaller side respectively. Cut the flaps as shown below.

Start sticking the side flaps together and then the middle flap over it. This will make the lid for the box.


4) Take a decorative paper and stick to the box. Also, make a hole in the lid and fix an eyelet on it so that we can insert the ribbon string in that.

* Making Of Mini Album *
1) Take a card stock paper of measurement 33cm*14.5cm, Mark and score at 11cm, 14cm, 25cm and 28cm. Fold it along the lines marked.

Cut a decorative paper and stick it on the inner side of the album.

2) Now decorate the front or outer part of the album with decorative paper.


Make a hole with the help of a punch on the flap, insert a small piece of ribbon in it then insert the eyelet and secure it.

3) For binding, you will need three pieces of cardstock paper -
14.5cm*6cm - Mark and score at 1.5cm and 4.5cm
14.5cm*5cm - Mark and score at 1.5cm and 3.5cm
14.5cm*4cm - Mark and score at 1.5cm and 2.5cm

Stick the 1st on 2nd the 3rd under 2nd. Then stick them on the album.


4) Now, we will make the pages for our album. We will make 6 pages measuring 14.5cm*10.5cm. Stick decorative paper on one side of the page.


5) Start sticking the pages on the flaps one by one.


After sticking the pages, stick the decorative paper on the other side of it. Making of the album is completed.


* Making Of Camera Lens *
1) Cut a circle of 3cm radius, with the same center draw 2 circles of radius 2.5cm and 2cm. Cut the inner circle and cut the outer circle into small triangles as shown below. Take a strip measuring 20cm*3cm, mark 1cm on the smaller side, then cut them in a sawtooth pattern.

2) Stick the ends of the strip making sure it is of the same dimension as the circle we created. Now take the transparent sheet cut it in a circle of radius 2.5cm and stick in on the inner side of the circle we made. Now, cut a circle of radius 2.5cm of decorative paper and stick to another one.

3) Now take the transparent sheet circle and place it over the decorative paper one and stick the little flaps.

4) Stick the created lens on the box. This completes the making of the camera shaped mini album.

Hope you all liked it.
THANK YOU!
No comments:
Post a Comment